
These are the steps I took in order to unlock the bootloader of my Moto G5 Plus. Ultimately I would like to install custom recovery software on it à la TWRP and root it with chainfire’s SuperSu. I’ve also included some extra notes in places that that gave me problems or I thought were tricky. The normal caveat applies: these steps worked for me, but your mileage may vary.
Prerequisites for Bootloader Unlocking
- A Moto G5 Plus phone
This should work for either the 32GB/2GB or 64GB/4GB variants but will definitely not work for, and could possibly brick, any Amazon “Special Offers” Moto G5 Plus.
- A PC running Windows, OS X, or Linux
I am using an Apple PowerBook Pro running Ubuntu 16.10 Yakkety Yak.
- The latest Motorola drivers
Windows (and possible OS X) users will need these, but Linux users will not.
Download link:
motorola-global-portal.custhelp.com/app/answers/detail/a_id/88481
Follow Motorola’s instructions to make sure your drivers are installed correctly. - A Motorola Account
Sign in or create an account here:
https://accounts.motorola.com/ssoauth/login - A USB B to Micro USB cable
- The Android Debug Bridge (ADB) and Fastboot programs
Originally you had to download the entire Android SDK if you wanted just these two programs. Fortunately Google recently made available for download the Android Platform-Tools package containing these programs. The most recent software is available for download at:
https://developer.android.com/studio/releases/platform-tools.html
Download the appropriate version for your OS and install adb and fastboot according to Google’s instructions.
Moto G5 Plus Bootloader Unlocking
- Back up anything on your phone that you want to save: apps, user data, pictures, etc. You WILL lose it all if you follow these steps.
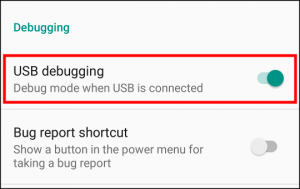
- Make sure that the Developer Options settings are activated on your phone. If they are not, and you don’t know how to turn them on, check out my post “How to Enable Developer Options in Android 7 Nougat“.
- With Developer Options activated, make sure that USB debugging is enabled. Go to Settings →Developer Options and scroll down until you find USB debugging. Turn it on if it is not already.
- Power off your phone.
- Boot your phone into fastboot mode by pressing the volume down and power buttons at the same time.
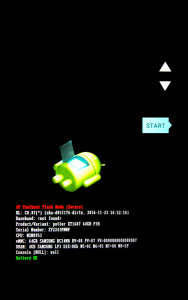
- Plug your phone into your PC.
- In the terminal run fastboot oem get_unlock_data
tpodlaski@Alabama:~
![fastboot oem get_unlock_data (bootloader) slot-count: not found (bootloader) slot-suffixes: not found (bootloader) slot-suffixes: not found ... (bootloader) Unlock data: (bootloader) 3A16580618696538# (bootloader) 5A5932323433504E4D46004D6F746F2047200000# (bootloader) A07864BA861114F6BE7B11C89E8F06FF742FC916# (bootloader) 839889FA000000000000000000000000 OKAY [ 0.099s] finished. total time: 0.099s </pre> You may find some extraneous output when you run the command, but as long as you have lines similar to the <em>(bootloader)</em> lines above, and the return status was <em>OKAY</em>, then you can move on the next step.</li> <li>The data on the <em>(bootloader)</em> lines below the initial <em>(bootloader) Unlock data:</em> line needs to be assembled into a single string with no line breaks or carriage return. The easiest way to do this is in a text editor so open your favorite text editor and paste the date strings one immediately after the other making sure not to include (bootloader) or any leading spaces. [br] <a href="http://www.neuraldump.com/2017/05/how-to-unlock-the-moto-g5-plus-bootloader/unlockcode-2/" rel="attachment wp-att-4221"><img class="aligncenter size-medium wp-image-4221" src="http://www.neuraldump.com/wp-content/uploads/2017/05/unlockcode-1-300x252.png" alt="Bootloader unlock code" width="300" height="252" /></a></li> <li>Go to the <a href="https://motorola-global-portal.custhelp.com/app/standalone%2Fbootloader%2Funlock-your-device-a/session/L3RpbWUvMTQ4NDU2OTQxOS9zaWQvQ1hTallQOG4=" target="_blank" rel="noopener noreferrer">Motorola unlock page</a>. If you haven't already, log in with you Motorola ID or create one if you do not have one.</li> <li>Read through and understand all of the risks associated with unlocking your bootloader. If you wish to continue, click the <em>Next</em> button at the bottom of the page.</li> <li>On the next page, scroll down to step #6 and in the text box paste the string you concatenated in step 7 into the textbox and then press the <em>Can my device be unlocked?</em> button. [br] <img class="aligncenter wp-image-4243" src="http://www.neuraldump.com/wp-content/uploads/2017/05/unlocktextbox-300x89.png" alt="Device unlock textbox" width="500" height="149" /></li> <li>If your phone can be unlocked, a <em>Request Unlock Key</em> button will appear at the bottom of the page. Click to agree to the legal agreement and click the <em>Request Unlock Key</em> button. The unlock key will be e-mailed to address associated with your Motorola account. [br] <img class="aligncenter wp-image-4246" src="http://www.neuraldump.com/wp-content/uploads/2017/05/requestuynlockkey-300x78.png" alt="Request unlock key" width="500" height="131" /></li> <li>Check your mail for a message from Motorola containing the code you will need to unlock your device.</li> <li>With your phone in fastboot mode and connected to your computer, run <span class="code">fastboot oem unlock UNIQUE_KEY</span> where <span class="code">UNIQUE_KEY</span> is the key sent to you by Motorola. <pre class="terminal crayon:false"><span style="color: #00ff00;">tpodlaski@Alabama</span>:<span style="color: #00ffff;">~</span>](https://neuraldump.net/wp-content/ql-cache/quicklatex.com-0b7721c4ef6b113f2f3619f526f6ab25_l3.png "Rendered by QuickLaTeX.com") fastboot oem unlock 2CQRKLBXBGF545ZIN3ORP
(bootloader) slot-count: not found
(bootloader) slot-suffixes: not found
(bootloader) slot-suffixes: not found
...
(bootloader) Bootloader is unlocked! Rebooting phone
OKAY [ 2.695s]
finished. total time: 2.695s
fastboot oem unlock 2CQRKLBXBGF545ZIN3ORP
(bootloader) slot-count: not found
(bootloader) slot-suffixes: not found
(bootloader) slot-suffixes: not found
...
(bootloader) Bootloader is unlocked! Rebooting phone
OKAY [ 2.695s]
finished. total time: 2.695s
Congratulations! Your bootloader is unlocked (and your warranty is void). Motorola won’t ever let you forget that you’ve unlocked your bootloader as every time you boot your phone you will be greeted with a screen like:
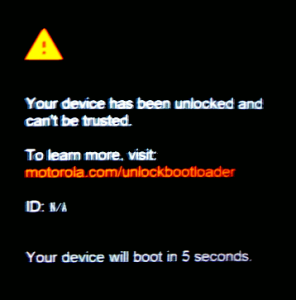
If you haven’t installed twrp yet, your warning screen might display “bad key” instead of “N/A” for the ID. Don’t worry about it. Nothing is wrong. I wasted a lot of time thinking this was a problem, but after doing some research I learned this was normal.
It is possible to get rid of this warning screen if it bothers you. It is my plan to write about it in a future post.
Unlocking your bootloader is just the first step toward totally taking control of your phone. Next comes installing a custom recovery like twrp which will allow you to root your phone and do tons of other cool things with it. I’ve already done both and will cover in detail how I did it in my next post. Until then …
1 comment
Hi,
I’m getting “(bootloader) invalid boot state ” this error